Erasing SPI NAND Flash
This guide explains how to erase the SPI NAND flash memory on Luckfox Lyra boards that include onboard flash storage.
Critical Warning: Data Loss
Erasing SPI NAND will permanently delete ALL data stored on the NAND flash. This action cannot be undone. Ensure you have backups of any important data before proceeding.
Why Erase SPI NAND?
The Luckfox Lyra boot process prioritizes SPI NAND flash over SD cards. If your board has SPI NAND with existing firmware:
- The board will boot from NAND instead of your Calculinux SD card
- Your SD card will be ignored even if properly flashed
- You must erase the NAND to enable SD card booting
Which Boards Have SPI NAND?
| Board Model | SPI NAND | Notes |
|---|---|---|
| Luckfox Lyra (Base) | ❌ No | SD card only |
| Luckfox Lyra B | ✅ Yes | 256MB SPI NAND |
| Luckfox Lyra Plus | ✅ Yes | 256MB SPI NAND |
| Luckfox Lyra Ultra/Ultra W | N/A | Uses eMMC, not NAND |
| Luckfox Lyra Zero W | Varies | Check your specific model |
| Luckfox Lyra Pi | Varies | Check your specific model |
Checking If You Have SPI NAND
Visual Inspection:
- Look for an additional chip on the board labeled "SPI NAND" or similar
- Check your purchase order/product specifications
Check Product Documentation:
- Refer to the Luckfox Lyra documentation for your specific model
Erasure Methods
Method 1: Windows - RKDevTool (Recommended)
This is the easiest and most reliable method for most users.
Prerequisites
- Windows PC
- USB Type-A to Type-C cable (data-capable)
- Luckfox Lyra board with SPI NAND
Step 1: Download Required Tools
- RK Driver Assistant: Download v5.13
- RKDevTool: Download v3.31
- Luckfox Firmware (any official image): Download from Luckfox
Step 2: Install Drivers
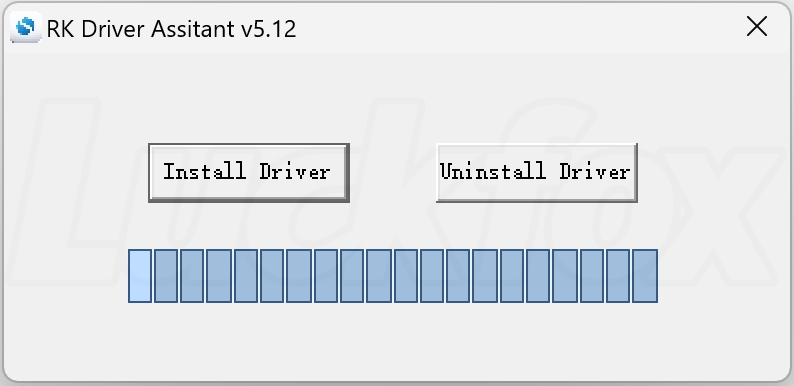
- Extract the RK Driver Assistant ZIP file
- Run
DriverInstall.exe - Click "Install Driver"
- Restart your computer after installation completes
Step 3: Enter Loader Mode
- Extract and open RKDevTool
- Method A - Using BOOT button:
- Disconnect the Luckfox Lyra from USB
- Hold down the BOOT button on the board
- While holding BOOT, connect the USB cable to your PC
-
Wait 2-3 seconds, then release the BOOT button
-
Method B - Using RESET button:
- With the board connected via USB
- Hold down RESET button
- While holding RESET, press and hold BOOT button
- Release RESET, wait 2 seconds
-
Release BOOT
-
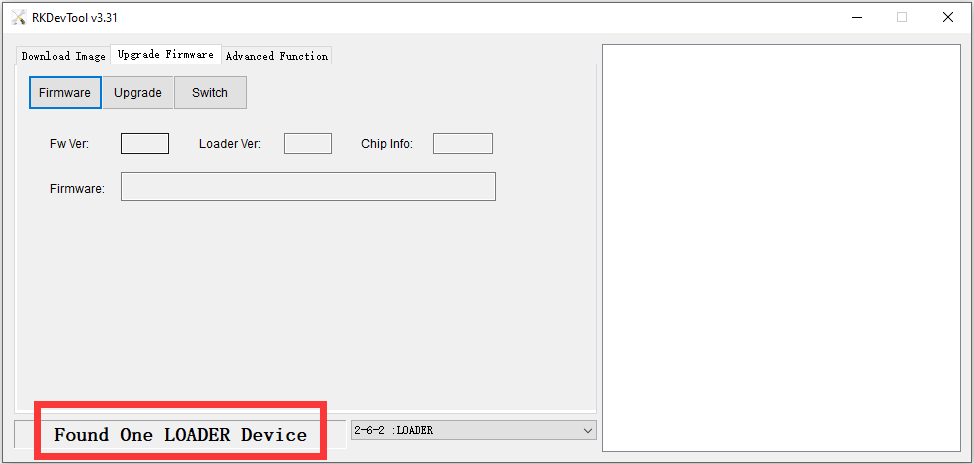
RKDevTool should display:
Found One LOADER Device
Troubleshooting Device Detection
If the device is not detected, check Windows Device Manager:
- Correct (Loader Mode): Should show "Rockusb Device" under "Universal Serial Bus controllers"
- Wrong: Shows as "ADB Interface" or other device
If not detected properly, try a different USB cable or USB port.
Step 4: Erase the NAND Flash
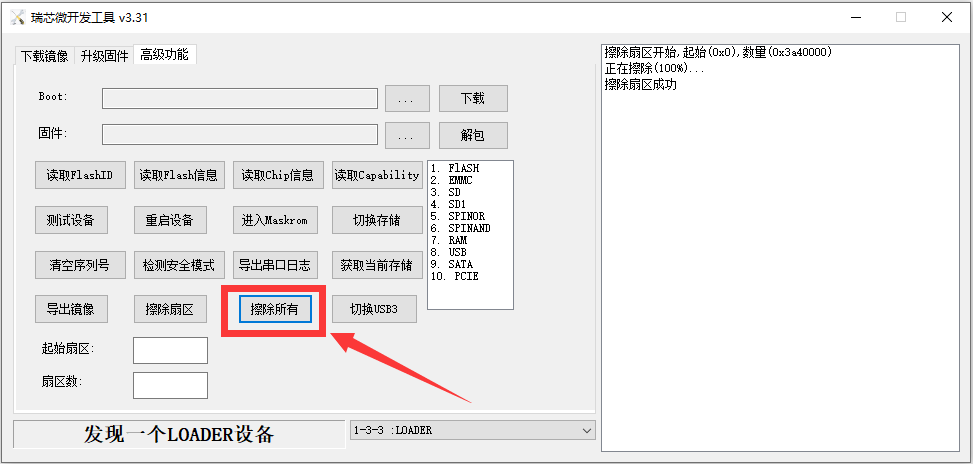
- In RKDevTool, click the "Advanced Function" tab (高级功能)
- Click "Erase Flash" button
- Wait for the process to complete
- Tool will display: "Erase Flash Success"
Alternatively, you can erase by flashing a minimal firmware:
- Click the "Firmware" tab
- Click the folder icon and select the downloaded firmware
update.img - Click "Upgrade" button
- Wait for completion: "Download Successful"
Step 5: Verify Erasure
- Disconnect the USB cable
- Insert your Calculinux SD card
- Power on the device
- The device should now boot from the SD card
Method 2: Linux (x86_64 Platform)
This method uses command-line tools on Linux.
Requirements
- Linux PC (tested on Ubuntu 22.04)
- Luckfox SDK or upgrade_tool
- USB Type-A to Type-C cable
Step 1: Download Tools
Download the Luckfox SDK which includes the flashing tools:
Or download standalone upgrade_tool:
- Available in the SDK under
tools/linux/Linux_Upgrade_Tool/
Step 2: Enter Loader Mode
- Hold the BOOT button while connecting the board to your PC
- Verify detection with
lsusb:
You should see output indicating Loader mode:
Step 3: Erase Using rkflash.sh
If you have the full SDK:
Step 4: Verify
Method 3: MaskRom Mode (Advanced/Recovery)
Use this method only if Loader Mode fails or the device is in an unrecoverable state.
Advanced Users Only
MaskRom mode requires physical hardware manipulation and should only be used when Loader mode fails.
Entering MaskRom Mode
- Locate the Flash Chip: Find the SPI NAND flash chip on your board
- Identify GND Pin: Locate a ground pin near the flash chip
- Short Circuit Method:
- Disconnect power from the board
- Use tweezers or a wire to short
FSPI_CLKpin toGND - While keeping the short, connect USB cable
- RKDevTool should display:
Found One MASKROM Device - Remove the short circuit once detected

- Erase in MaskRom:
- Use RKDevTool "Erase Flash" function
- Or flash a minimal firmware image
Method 4: Linux on the Device (Not Yet Documented)
Method Not Available
Methods for erasing SPI NAND directly from Linux running on the Luckfox Lyra (without external flashing tools) are not yet documented or tested.
This would theoretically be possible using mtd-utils and /dev/mtdX devices, but specific procedures for Calculinux have not been established.
After Erasing
Once the SPI NAND is erased:
- Insert SD Card: Insert your Calculinux SD card
- Power On: Connect power or USB
- Boot: The device should now boot from the SD card
- Verify: Check that Calculinux boots successfully
Common Issues
Issue: Board Still Boots from NAND
Symptoms: SD card is ignored, old firmware still runs
Solutions:
- Verify the erase completed successfully
- Try the erase process again
- Try MaskRom mode instead of Loader mode
- Check that your SD card is properly flashed
Issue: Cannot Enter Loader Mode
Symptoms: RKDevTool doesn't detect device
Solutions:
- Try different USB cable (must be data-capable)
- Try different USB port
- Check Device Manager for driver issues
- Reinstall RK Driver Assistant
- Try MaskRom mode
Issue: Erase Fails Midway
Symptoms: Erase process errors or hangs
Solutions:
- Disconnect and retry
- Try using MaskRom mode
- Ensure stable USB connection
- Check power supply is adequate
Issue: Device Won't Boot After Erase
Symptoms: No boot after erasing NAND
This is expected behavior! With NAND erased and no SD card:
- Insert your Calculinux SD card
- Power on the device
- It should boot from SD card
Recovery Options
If you need to restore the original Luckfox firmware to NAND:
- Download the official Luckfox firmware for your board model
- Follow the official flashing guide
- Flash the firmware to SPI NAND using RKDevTool
Additional Resources
- Official Luckfox Flashing Guide: wiki.luckfox.com/Luckfox-Lyra/Image-flashing
- Luckfox Forum: forums.luckfox.com
- RK Driver Downloads: Luckfox Tools
Questions?
If you encounter issues not covered here:
- Check the Boot Problems troubleshooting guide
- Ask in the Calculinux Forum
- Refer to Luckfox Official Documentation
- Open a GitHub Issue
Remember: Erasing SPI NAND is a one-way operation. Make sure you understand the implications before proceeding.